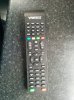
The one thing that really annoys me about my Star 2S box is the remote, you have to point it pretty much directly at the box for it to work.
So I decide to take the remote apart and see what I could do about it. It turns out the solution is really quite simple, you just need to add another infrared LED.
After completing this mod the remote was a hundred times better, I could point the remote at the ceiling and it would still work!
To carry out this you will need:
A soldering iron
Solder
Wire cutters
5mm infrared LED
The actual LED's I bought are:
10pcs 5mm High Power Infrared IR LED Wavelength 940nm UK Stock Free UK P+P | eBay
But any 5mm infrared LED should do the trick, there about £2 for a pack of 10
The first step is to take apart the remote, slide something thin down between the face of the remote and the edge and prize off the face of the remote.

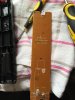
As you can see from the picture below the circuit board appears to be designed to take 2 LED's, however only one is fitted.

The picture below shows the bottom of the circuit board. The solder pads to connect the second LED are there but not used.

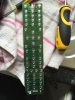
The next step is to remove LED and install 2 LED's as per the picture below.
Please note the orientation of the LED's, they only work when installed the correct way round!

Solder the LED into the board and trim off the excess wire with some wire cutters.

Now put your remote back together.
Finally you need to test your remote to see if both LED's are working. Take your phone and open the camera app. Point the remote at the camera and press any button, you should see the LED flashing on the screen of your phone. The light emitted from these LED's is very directional, you need the LED pointing square at the camera to see it brightly, you will need to change the angle of the remote to check both LED's.
That's it, £2 well spent and you no longer feel the need to smash the remote up every time you use it.
So I decide to take the remote apart and see what I could do about it. It turns out the solution is really quite simple, you just need to add another infrared LED.
After completing this mod the remote was a hundred times better, I could point the remote at the ceiling and it would still work!
To carry out this you will need:
A soldering iron
Solder
Wire cutters
5mm infrared LED
The actual LED's I bought are:
10pcs 5mm High Power Infrared IR LED Wavelength 940nm UK Stock Free UK P+P | eBay
But any 5mm infrared LED should do the trick, there about £2 for a pack of 10
The first step is to take apart the remote, slide something thin down between the face of the remote and the edge and prize off the face of the remote.
As you can see from the picture below the circuit board appears to be designed to take 2 LED's, however only one is fitted.
The picture below shows the bottom of the circuit board. The solder pads to connect the second LED are there but not used.
The next step is to remove LED and install 2 LED's as per the picture below.
Please note the orientation of the LED's, they only work when installed the correct way round!
Solder the LED into the board and trim off the excess wire with some wire cutters.
Now put your remote back together.
Finally you need to test your remote to see if both LED's are working. Take your phone and open the camera app. Point the remote at the camera and press any button, you should see the LED flashing on the screen of your phone. The light emitted from these LED's is very directional, you need the LED pointing square at the camera to see it brightly, you will need to change the angle of the remote to check both LED's.
That's it, £2 well spent and you no longer feel the need to smash the remote up every time you use it.