ste
TK Veteran
I BELIEVE THIS GUIDE WILL NOW NOT APPLY SINCE WOOSHBUILD HAS CHANGED IT'S INSTALLATION PROCESS BUT I'LL LEAVE THIS HERE ANYWAY INCASE THERE'S ANY USEFULL INFO FOR ANYONE.
***Please note that although this thread is primarily for the H2.H, it's very similar to setup other boxes including the H5.2TC***
I know there's a few of these around already but some people still seem to struggle so I thought i'd add my own incase it helps...
Please try and follow this guide carefully as there's people that have not done as described below then wonder why it hasn't worked.
My thread on cable boxes should also be viewed too ideally prior to setting your box up as this gives you pointers on some things > http://www.techkings.org/threads/faq-should-i-buy-a-cable-box.126162/
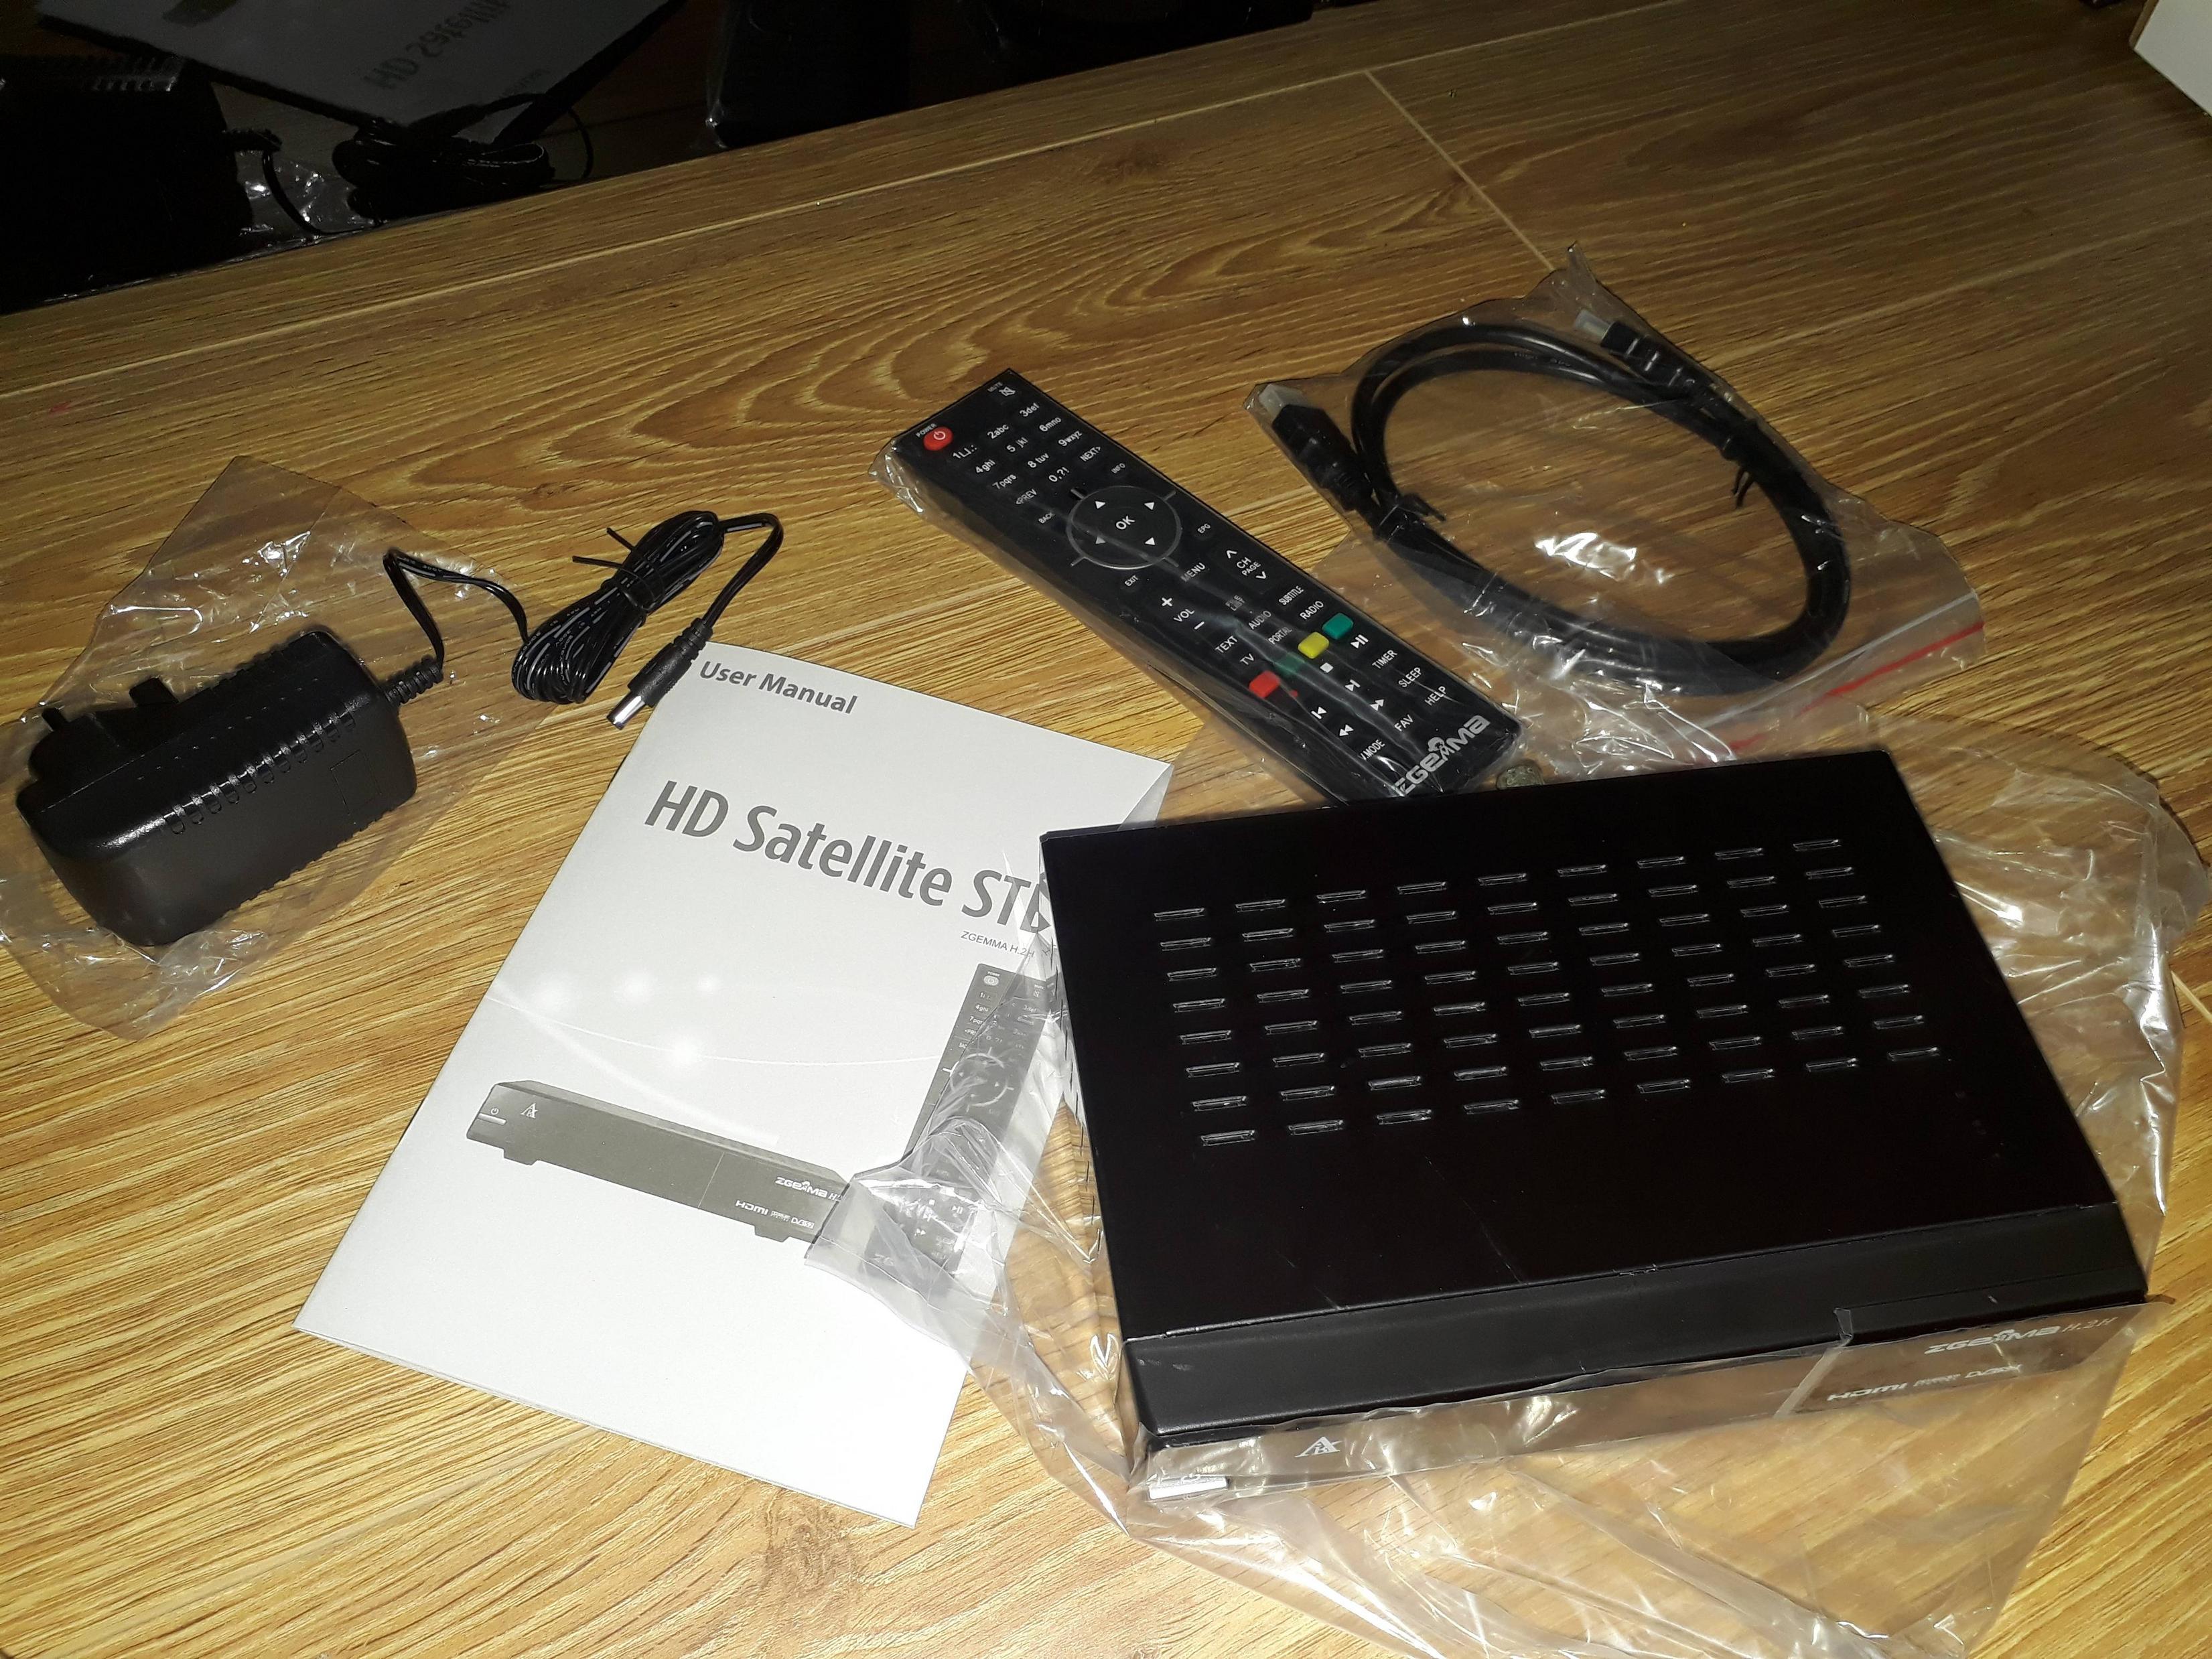
Ok, so you have just received you nice new zgemma box from the postman / postlady or courier...
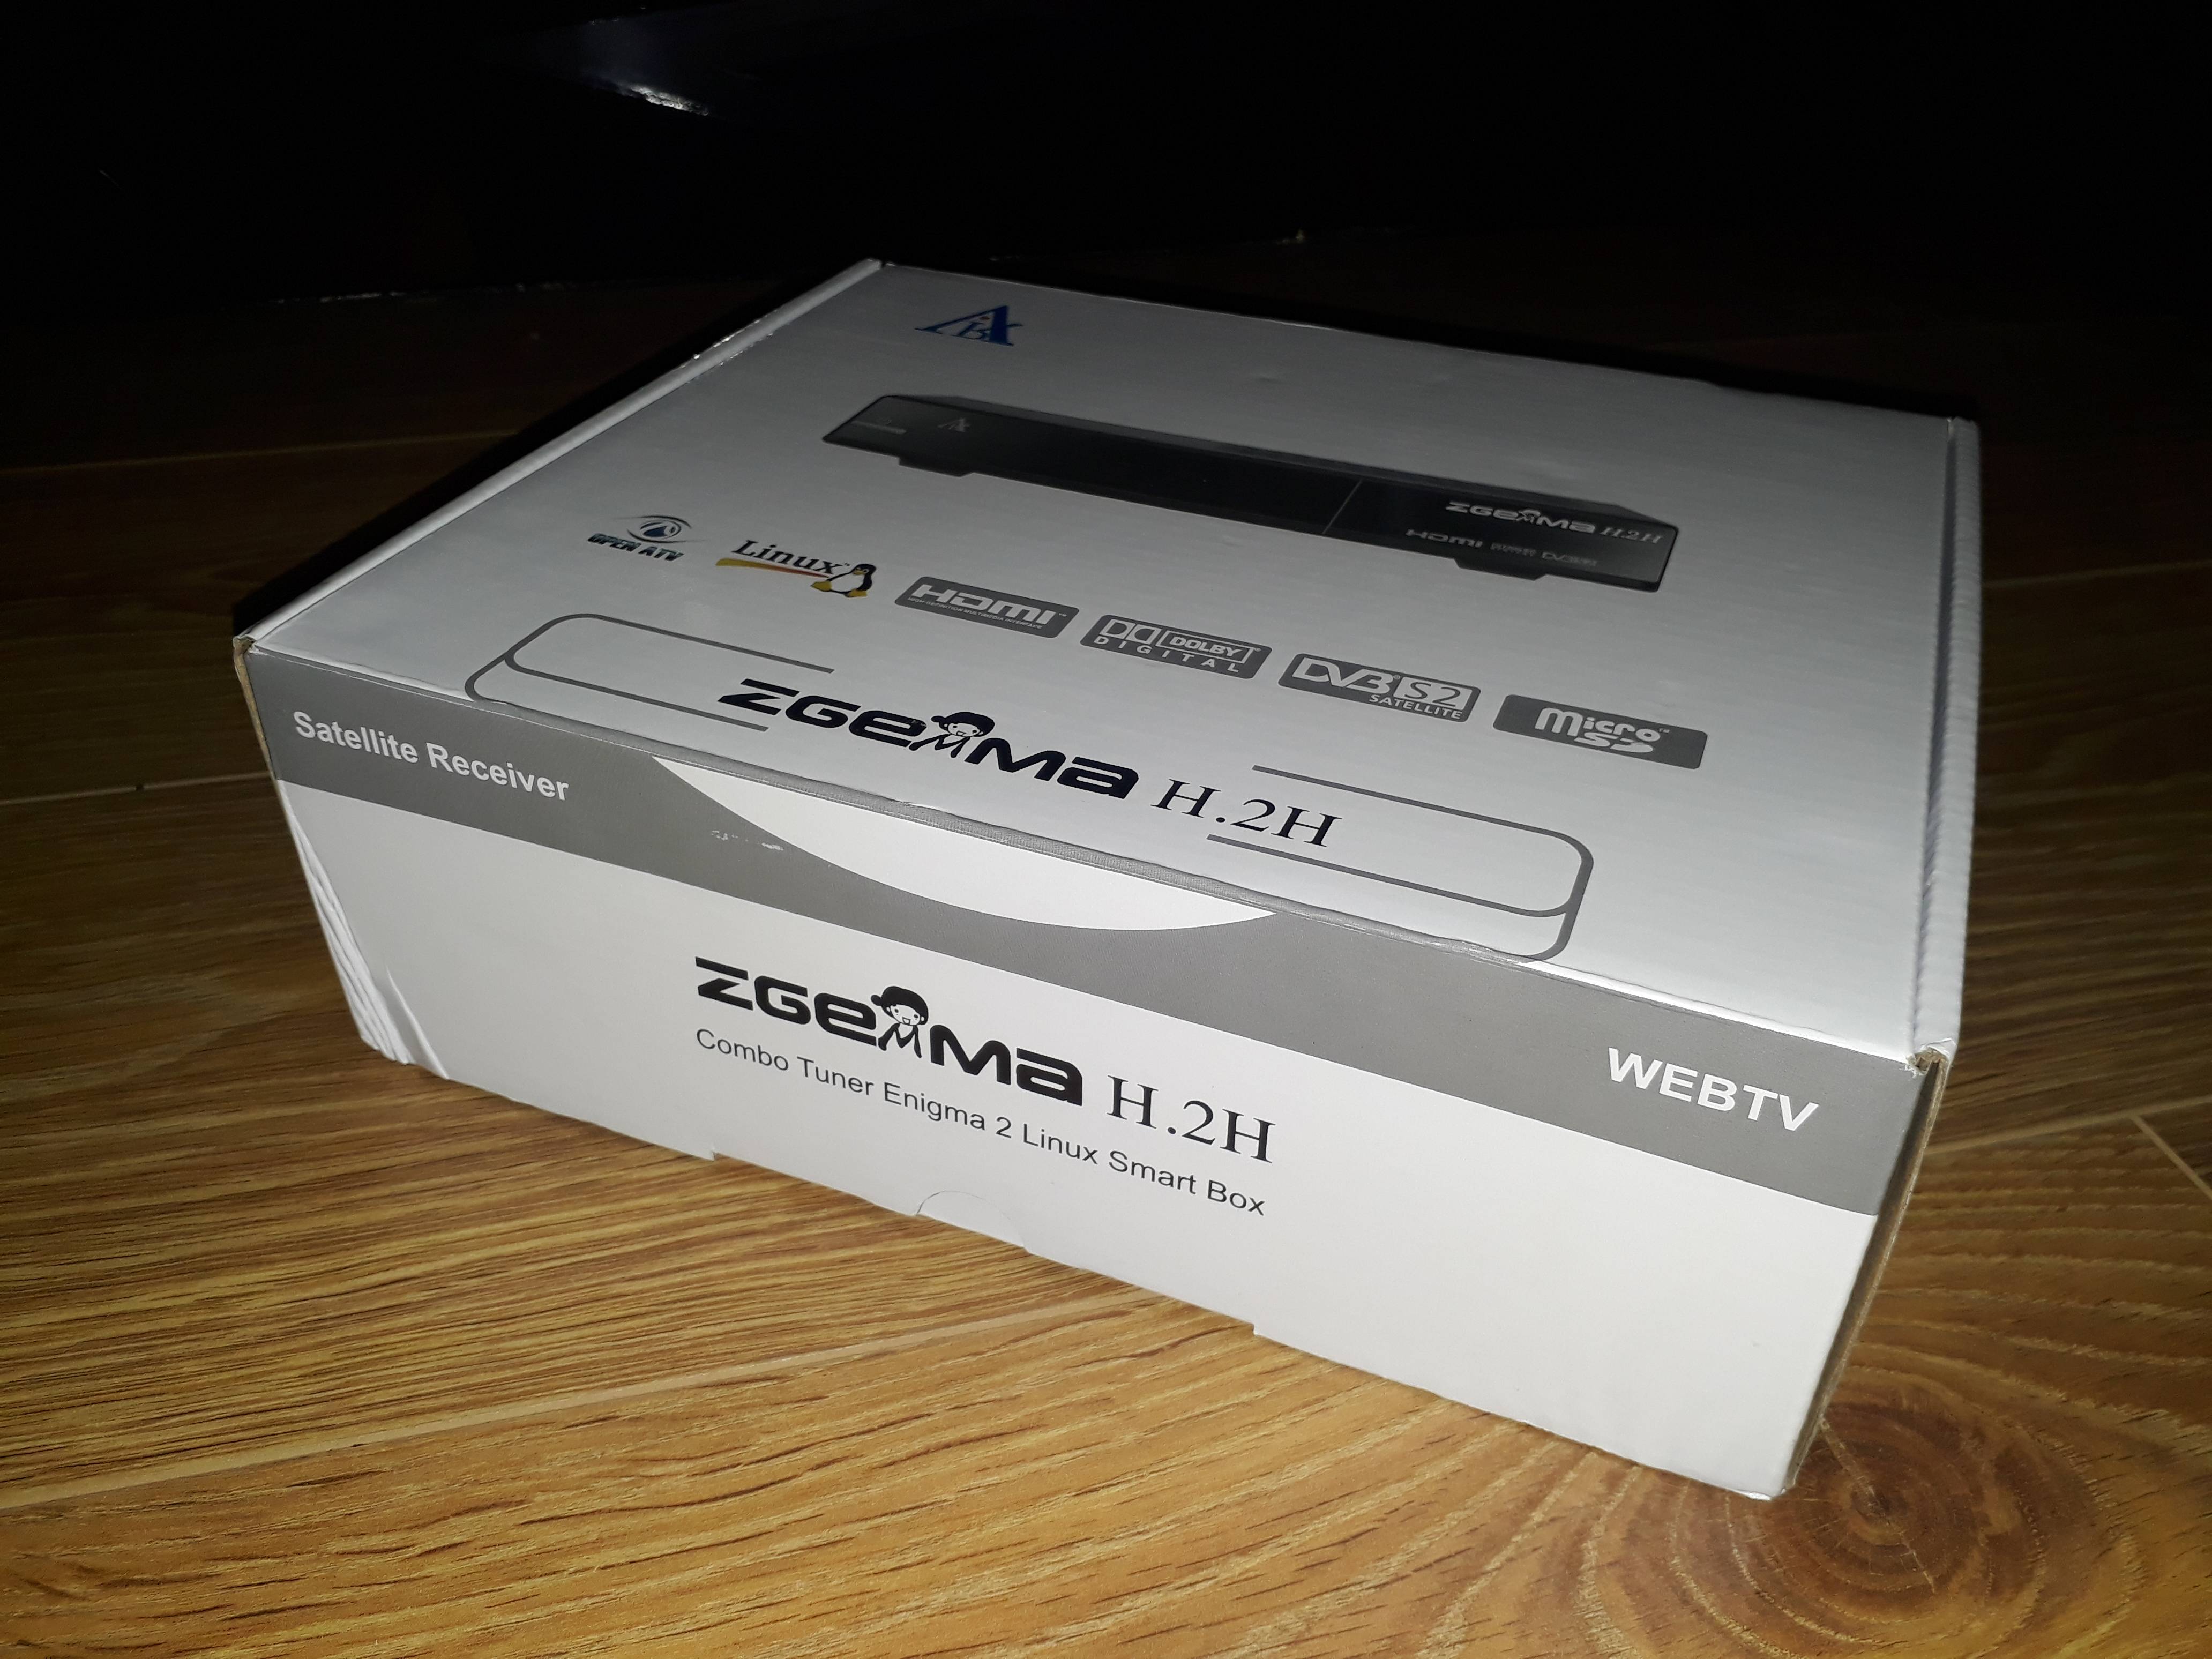
You are overjoyed and want to get stuck in - you open the box and find the follwing;
* 1 x Zgemma H2.H
* 1 x Power Adapter
* 1 x Small HDMI Cable
* 1 x Remote (Batteries Not Included... Not The Film)
* 1 x Useless Instructions
Your H2.H will look like this at the back:
***If you have a H5.2TC, there may not be a loop out***
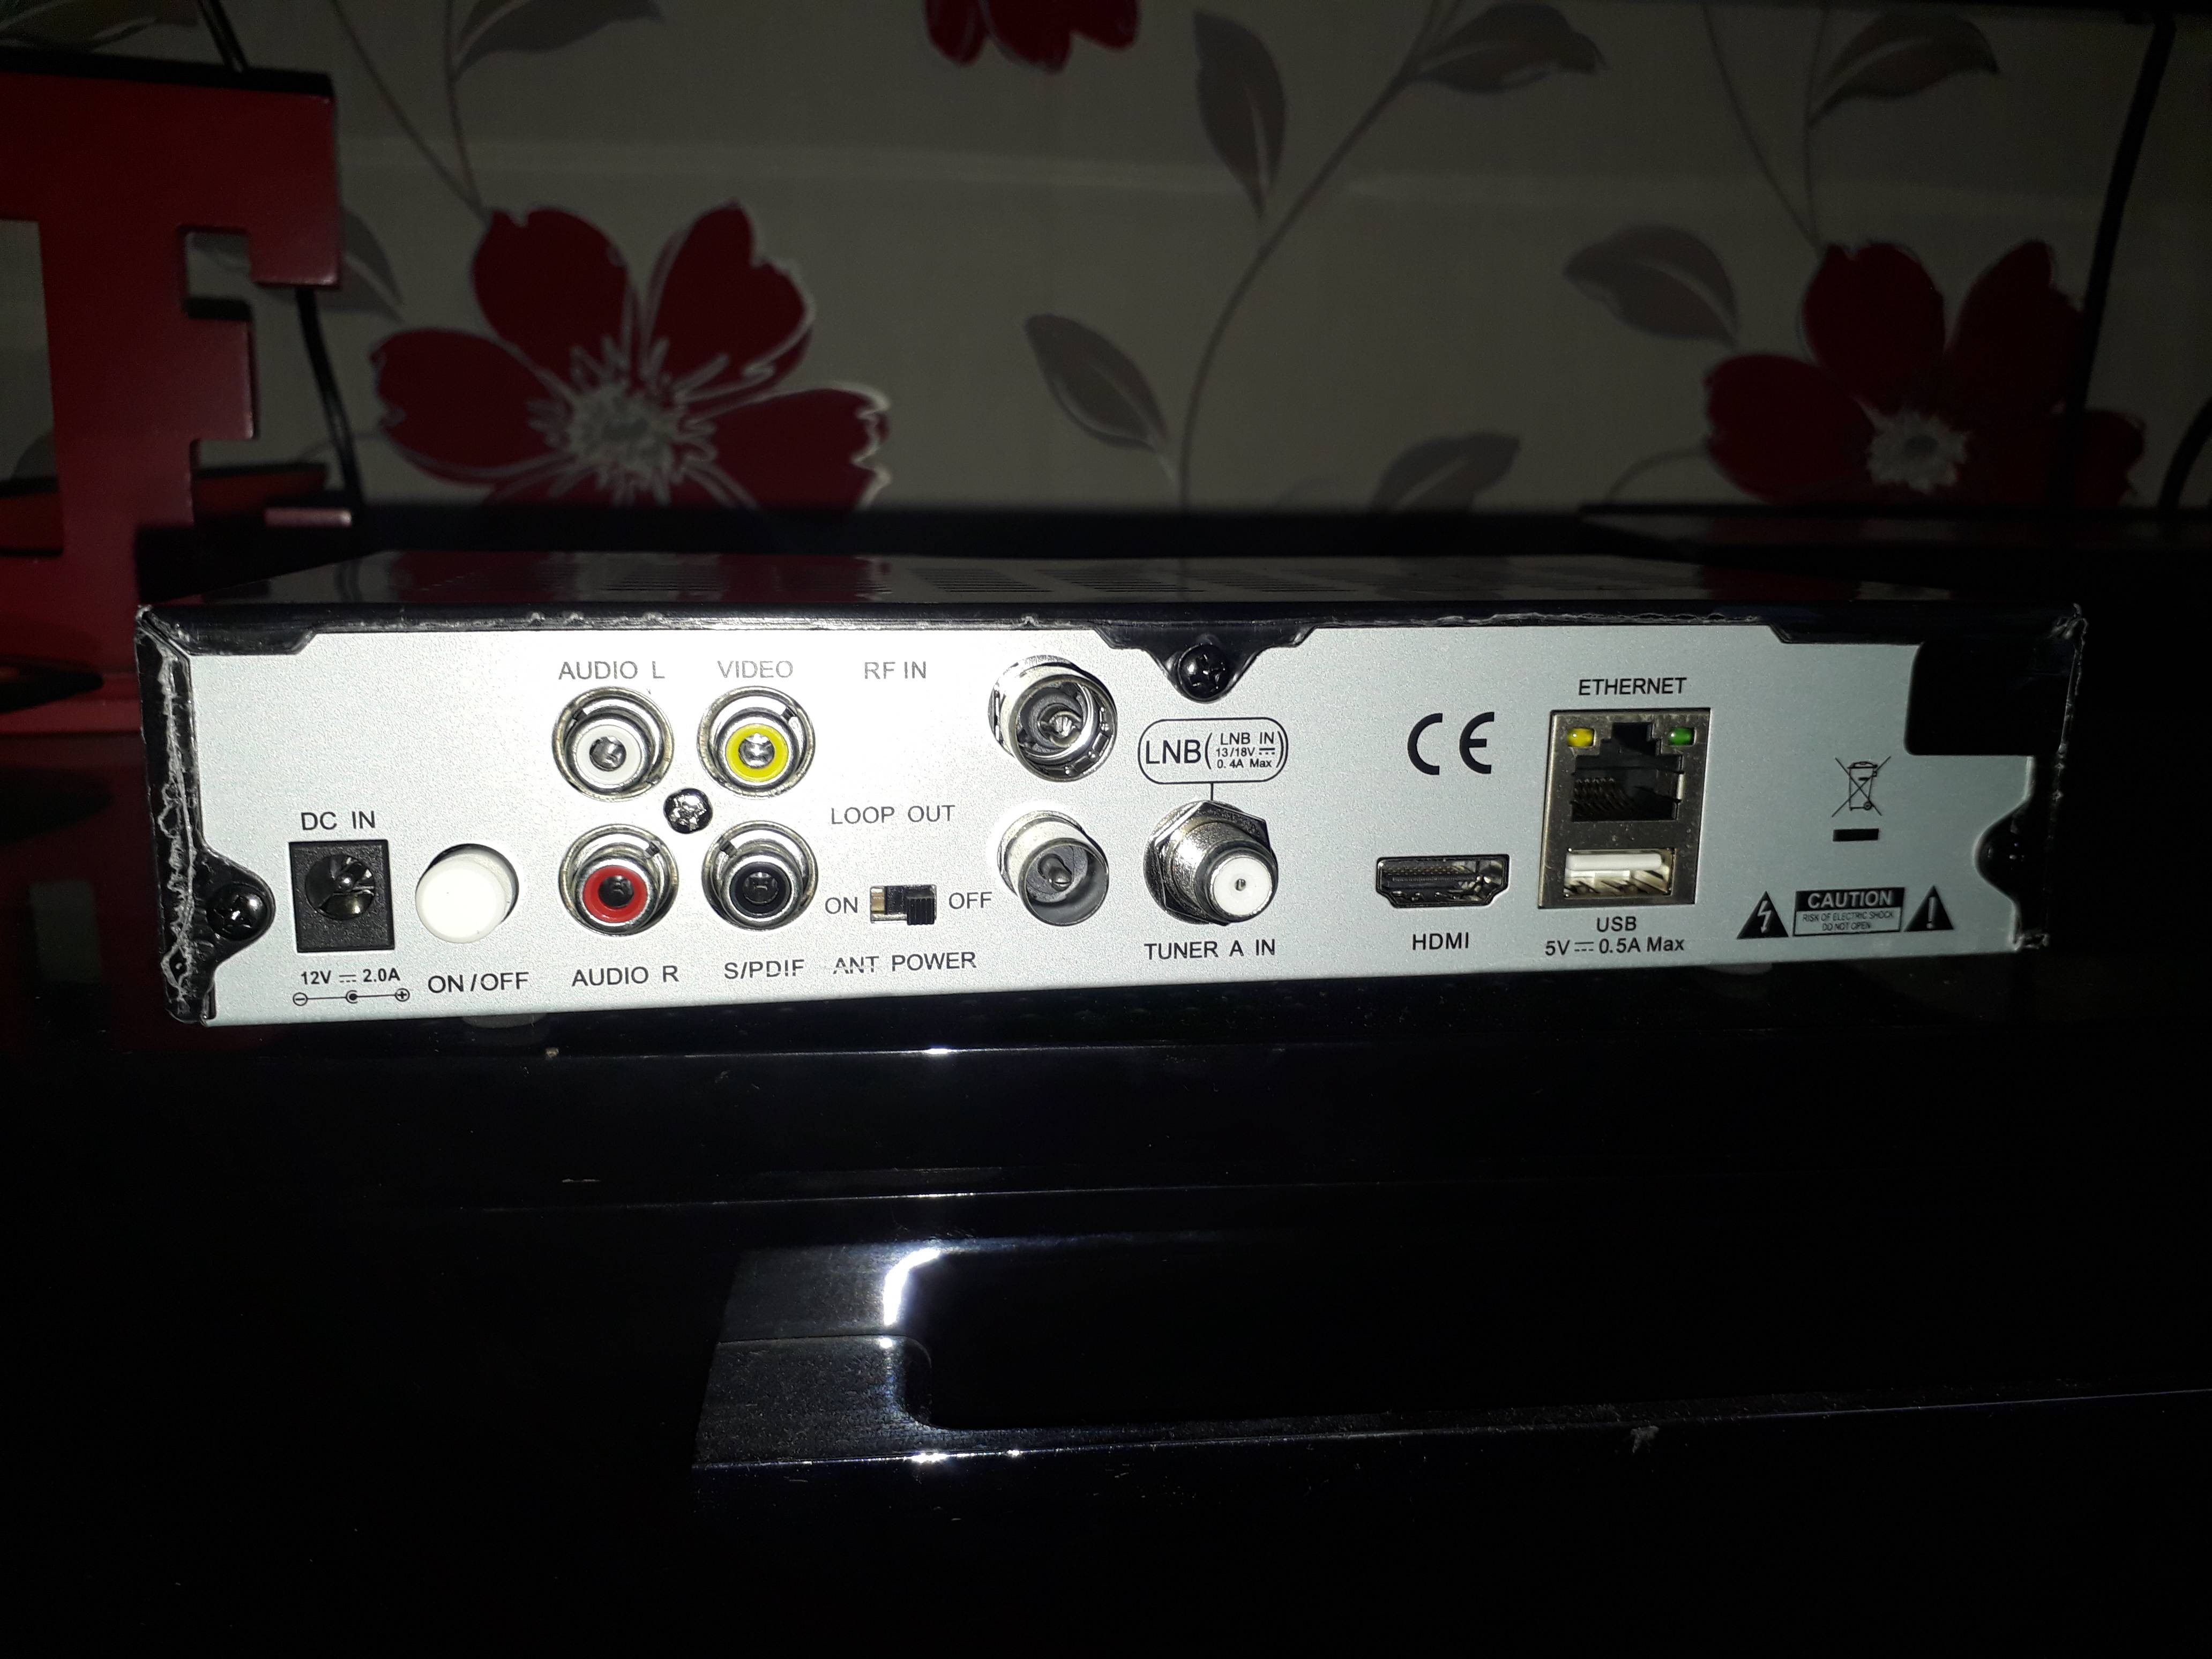
I am connecting both Satellite and Cable - the Satellite lead goes into the LNB IN port via the screw on F connection (Don't overtighten) and the Cable lead goes into the RF IN port via the additional little adapter you should have bought which look like this:
(NOTE: You may not need this if you already have a cable that looks like this at the end - the V6 box does I believe).

Once you've plugged everything in, it should look like so (as long as you're using both sat and cable):
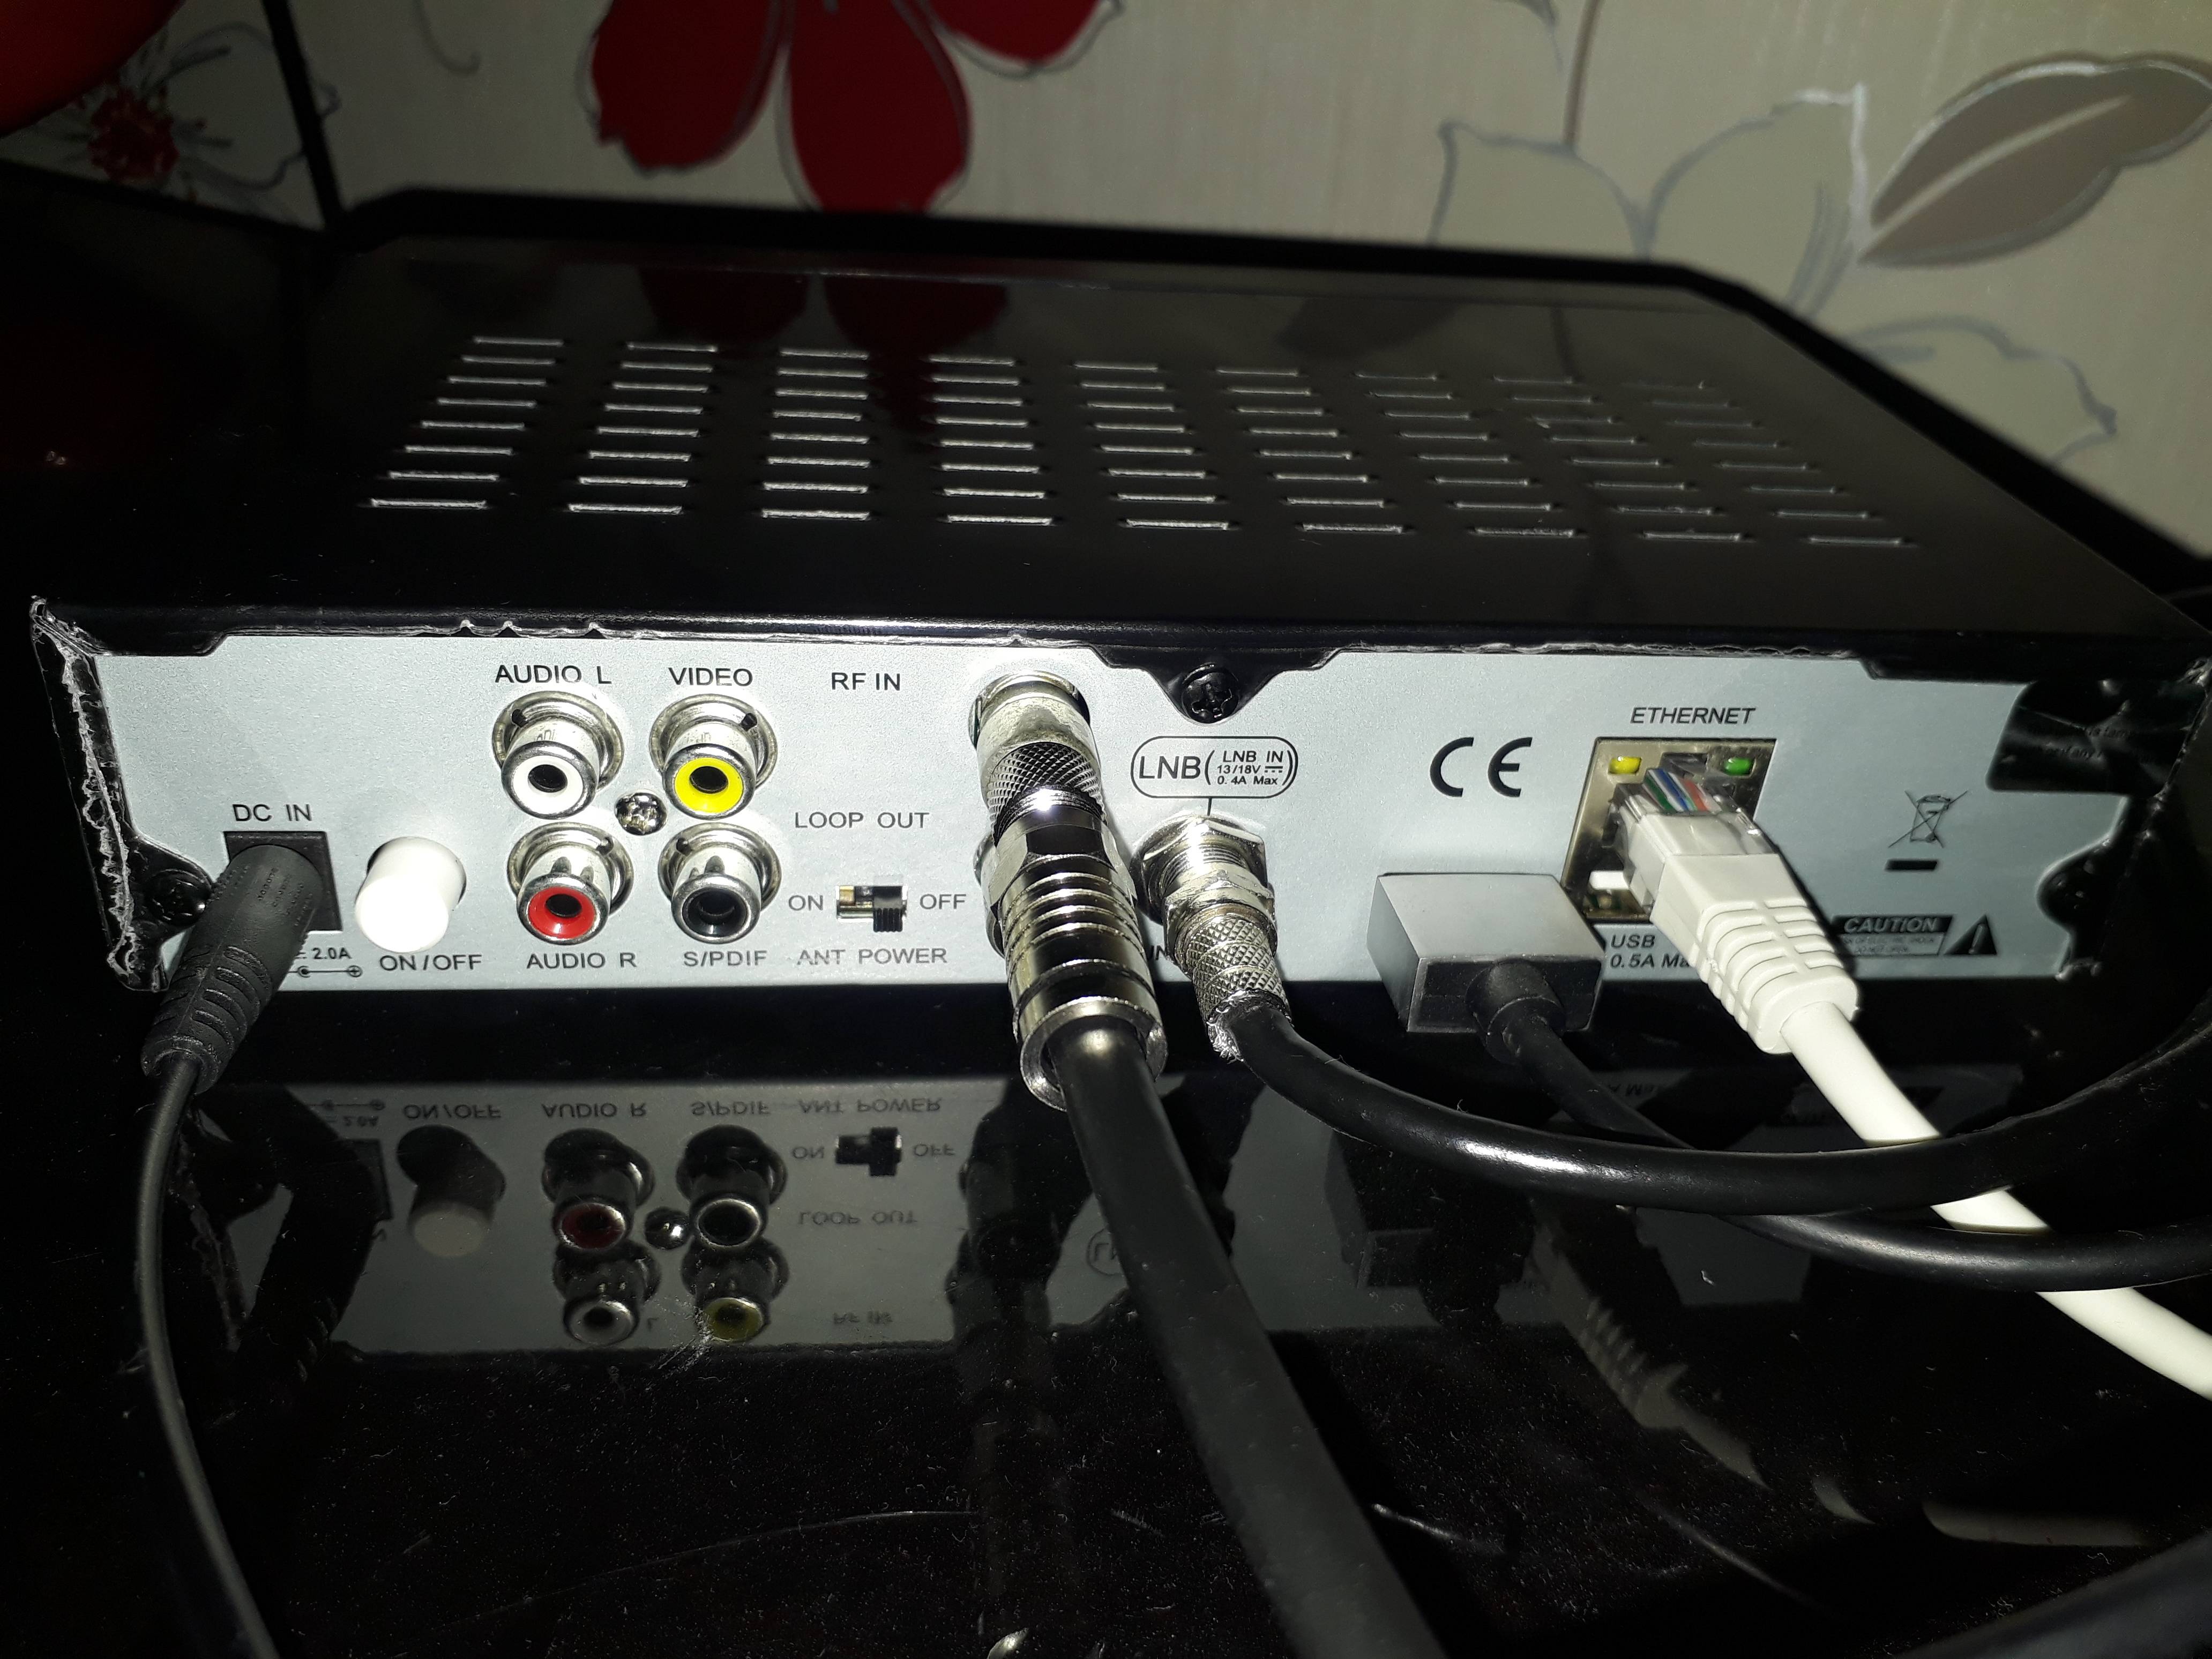
I haven't connected a USB drive to the rear port yet - I will do this once it's in the set-up process.
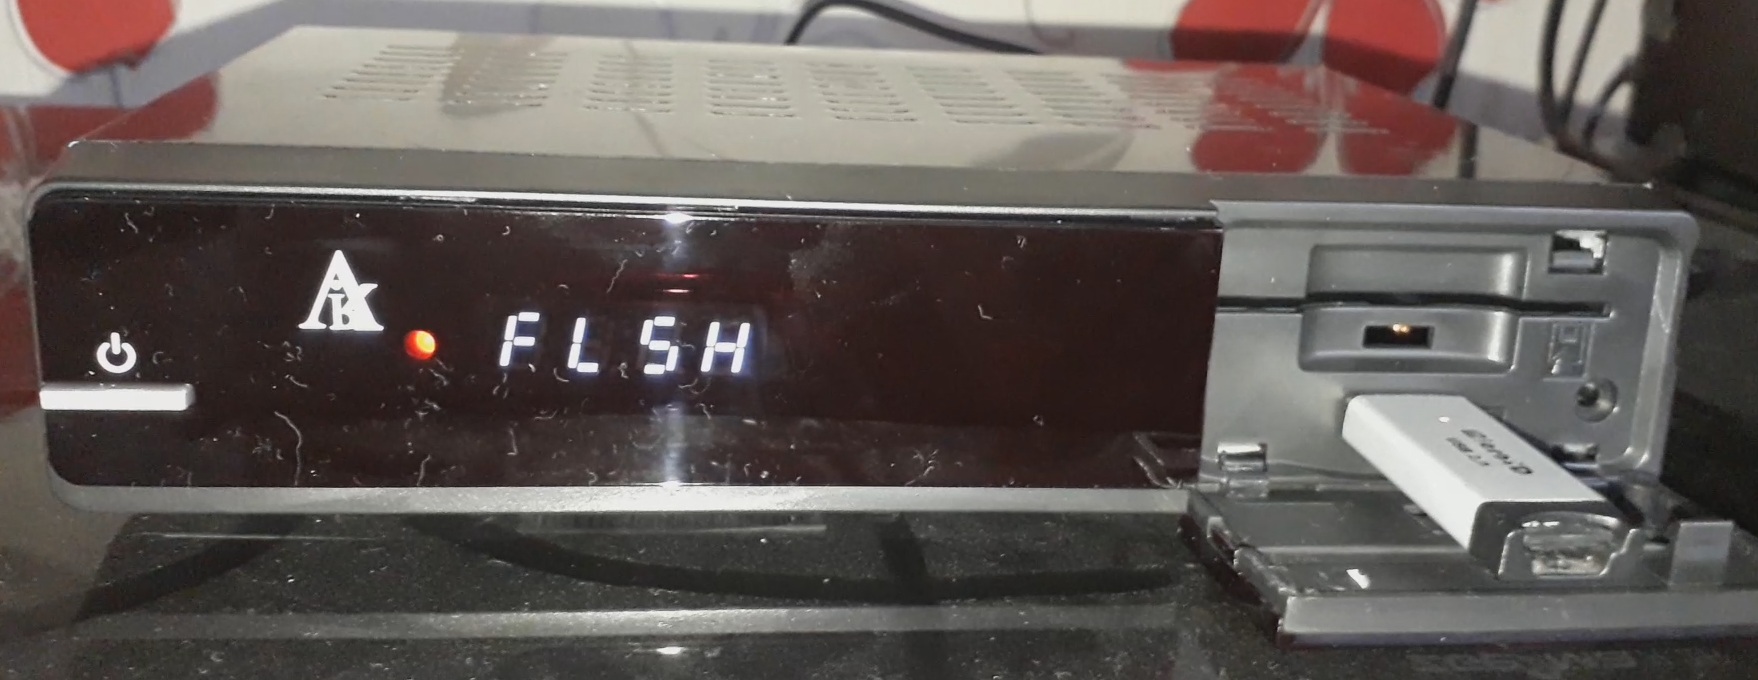
Ok, now you need to get your USB drive to flash the box - this should have the firmware on it ready then plug it into the front port of your zgemma then turn it on with the button at the back - It should come on the display at the front BOOT then change to FL5H within a couple of seconds.
Firmware can be obtained by following the link to the Wooshbuild site in the top right of this page > http://www.techkings.org/resources/wooshbuild-v5-zgemma-s-2s-h2s-h52s-h2h-h5-h52tc-h1-h2-i55.10/
Once it's flashed, the front display will change to BOOT and the progress indicating will start counting up on the box - your TV screen will now display a Wooshbuild screen followed by a little video animation clip - as soon as this video starts, hit one of the coloured buttons on the screen and now you should have Easy Setup displayed on your screen.
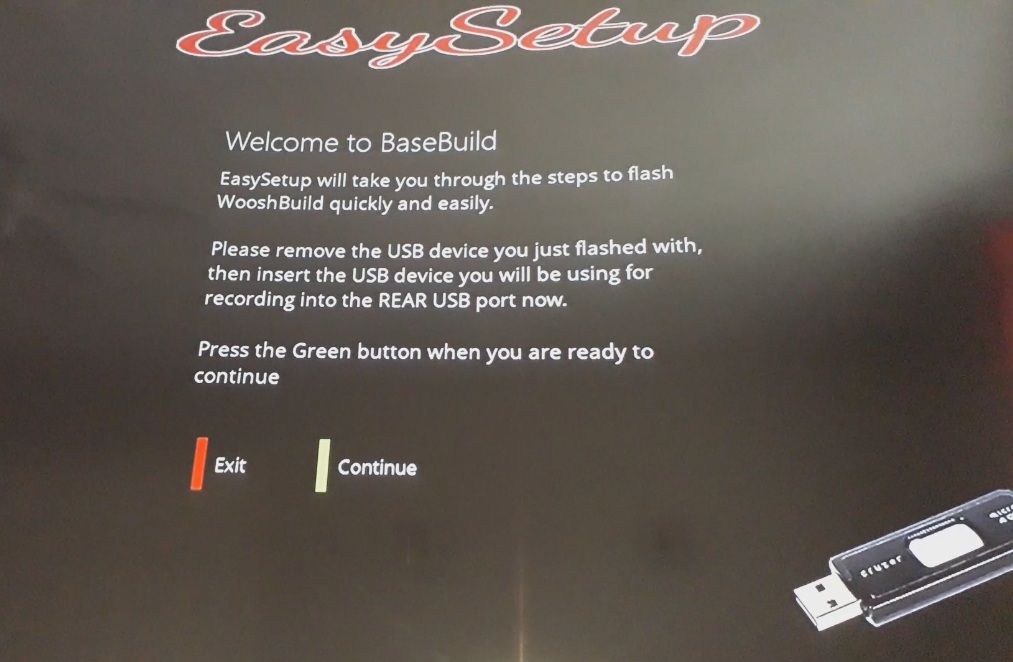
Now, insert your USB drive that you will be using permanently into the USB REAR port then hit the GREEN button on the remote to continue.
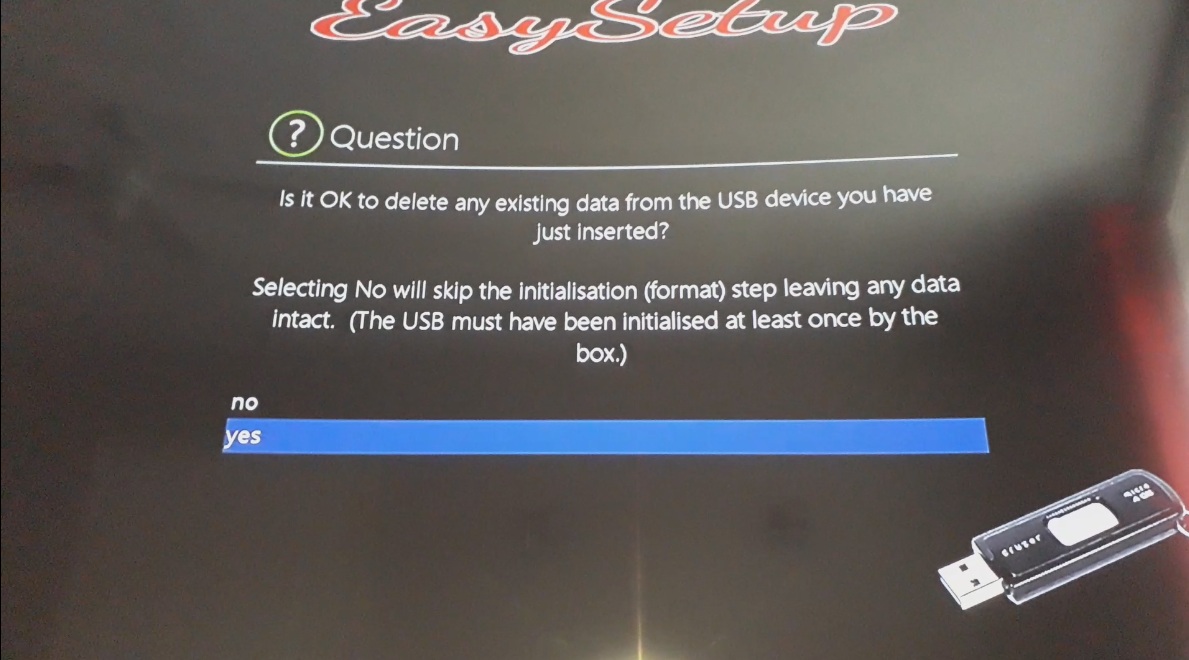
You will now be asked is it ok to delete existing data and initialise the drive - select YES and press OK.
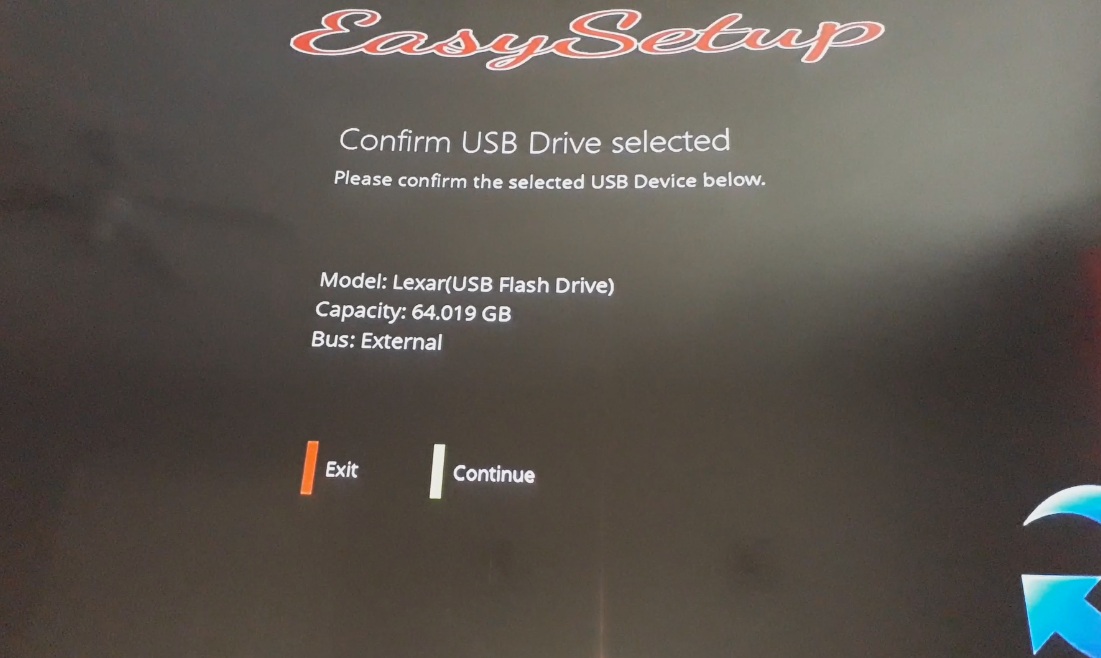
On the next screen, make sure your USB device is visible and highlighten then click on GREEN to continue - this will then bring up another screen asking you to confirm, press GREEN to continue.
Once again, it will ask "Are you sure..." - select YES and press OK... It will then begin to initialise the USB drive which takes a minute then once it's done this, it will automatically start to create the swap file - you don't need to press anything at this stage, just wait for it to get to the "Select your Country" screen - I am in England so I obviously chose England then hit GREEN to select it... it will again ask "Is this correct" - select Yes and press OK.
It will then go to region selection - I am in merseyside so I obviously chose merseyside and hit OK to select it. It once again asks "Is this correct" - select yes and hit OK.
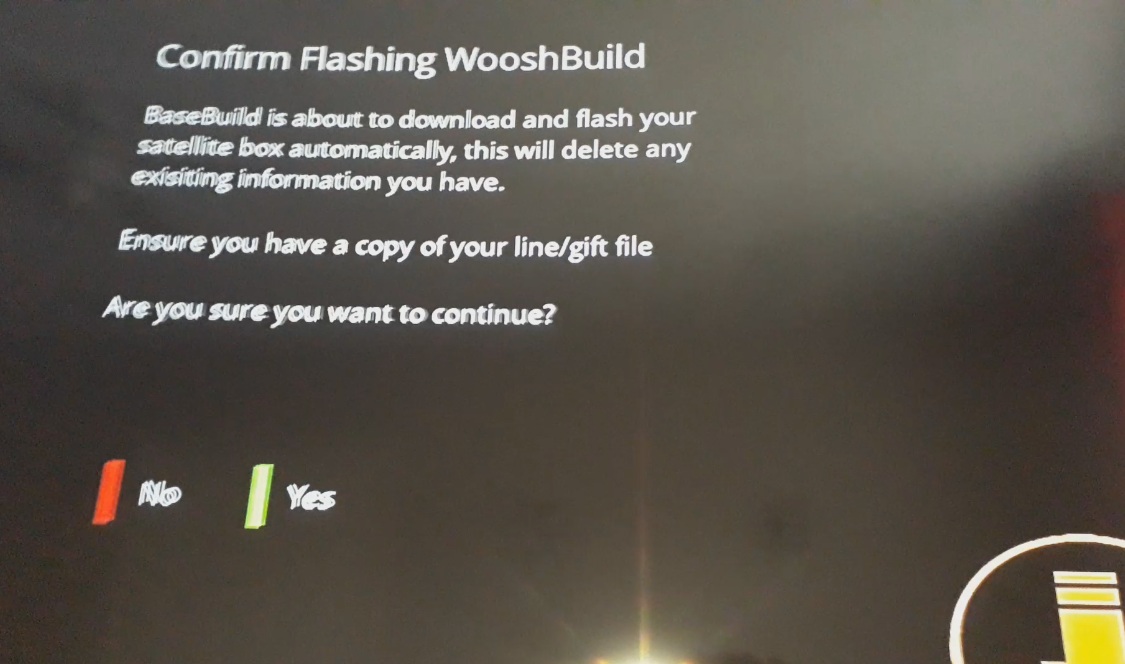
It will then ask you to confirm flashing of Wooshbuild - hit GREEN for yes.
It will once again ask "Are you ready..." - hit GREEN for "Do It Now"
It will now download the latest version onto the box and begin to FLASH! ... sit back and wait whilst enjoying the Flash Gordon tune
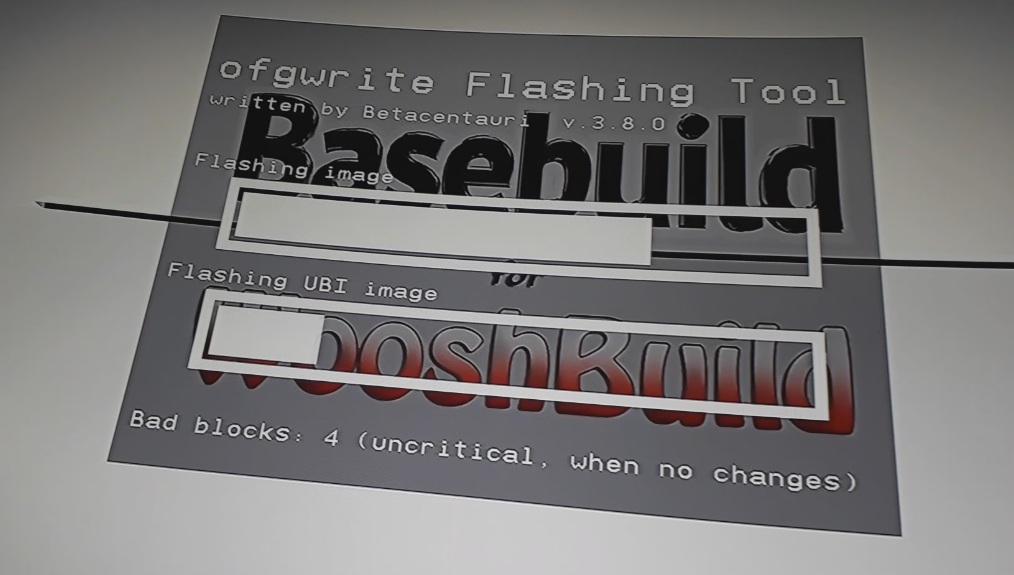
After a minute or two, the screen will show ofgwrite Flashing Tool - the FLASH music will stop after a few seconds and the screen background will turn white ... you will get some info along the bottom regarding bad blocks - this is normal and nothing to worry about.
Once this is complete, your box will begin to boot up and after a couple of seconds, the Wooshbuild splash screen will display on your tv screen - once it's fully booted up, if you have it set up like me, your SATELLITE channel will start to play BBC1 HD.
The box is now flashed and you're ready to start setting it up.
You want to press MENU on remote then go down to Setup then go down to Service Searching then Tuner Configuration so you see your tuners displayed here...
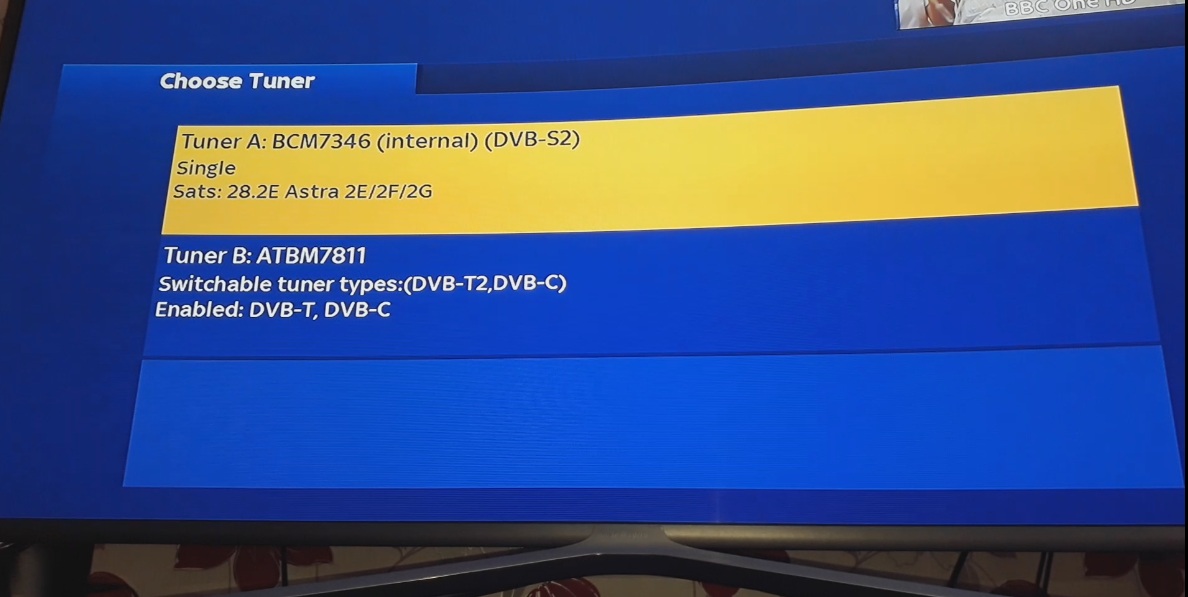
If you don't want to use the SATELLITE tuner, select it by pressing OK then press the right arrow on the remote to change Configuration mode from Simple to Not Configured then hit green to save then exit out back to the above screen then go down to Tuner B which is the cable tuner and press OK.
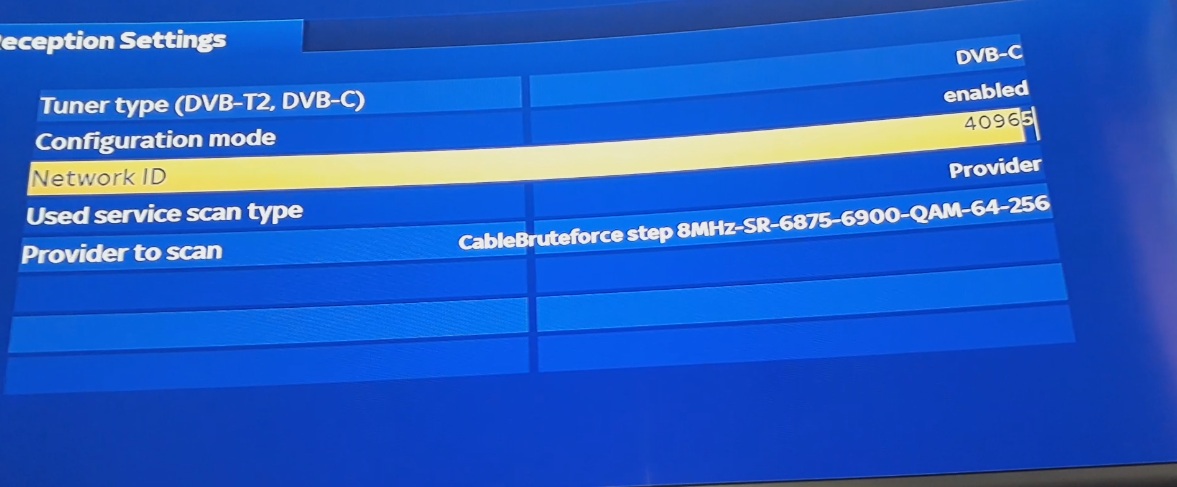
Here, go down to Network ID and enter your Network ID for your area - nothing else needs to be changed... just enter your ID then hit GREEN to save.
***Note: If you have the H5.2TC, you will have an extra tuner (C) which you also need to go into and enter your ID the same way***
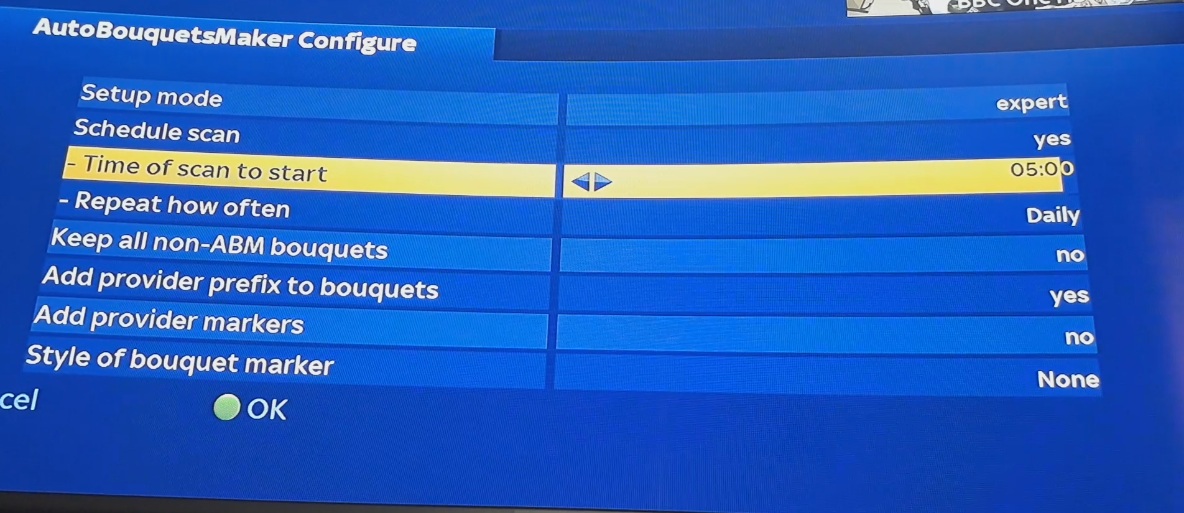
Now exit out of this and go back into MENU > SETUP > SERVICE SEARCHING then go into the AutoBouquetsMaker section. Click on Configure and change -Time of scan to start ... I set mine to start at 05.00 then if you're using both SATELLITE and CABLE then go to Add provider prefix to bouquets and change it to yes - this will make it easy for you to tell which bouquets are relevant to each service. Hit GREEN to save.
Now, in the AutoBouquetsMaker menu again, move to Providers and press OK then wait a few seconds for the providers list to populate.
As i'm using SATELLITE, I need to change the -S*y UK: area to my region then I need to carry on going down to -S*y UK: generate main bouquet and change this to yes then go further down the list until you get to V*rgin (UK) and change this from no to yes then go down to -V*rgin (UK): area and change this to your local region - if you cant find your exact location in this part, choose one that's as close to you as possible - this is just to give you bouquets that contain channels that are local to your region. Once you've done this, hit GREEN to save then back into the AutoBouquetsMaker menu list... at this stage you'll see a 'Hide sections' area - if you want to hide any bouquets for S*y or V*rgin then this is the area you do it in - again, just go into it and deselt ones you're not interested in (Adult for example) then take the tick off it and hit green to save your choices.
Now, it's time to start the actual service scanning so in AutoBouquetsMaker, go down to Start scan and hit OK. If you're using both SATELLITE and CABLE and you haven't changed the provider order, your S*y channels will scan first followed by the V*rgin channels.

Ok next, this isn't a neccesary step but I prefer the S*yQ skin so I press the Portal button on remote, go to --WB Config-- and press OK then go to Switch Skin and choose the S*yQ skin and press OK - it tells me that the GUI needs to restart to make the skin change - hit OK on yes then wait for the reboot.
I use the FAV button a lot at the bottom of the remote if I know what channel I want to watch and I like to have S*y on one page and V*rgin on the next so I can use the left and right arrows to go from S*y to V*rgin bouquets and vice versa so I will count how many S*y bouquets there is (I counted 21) so now on this same page as pictured below:
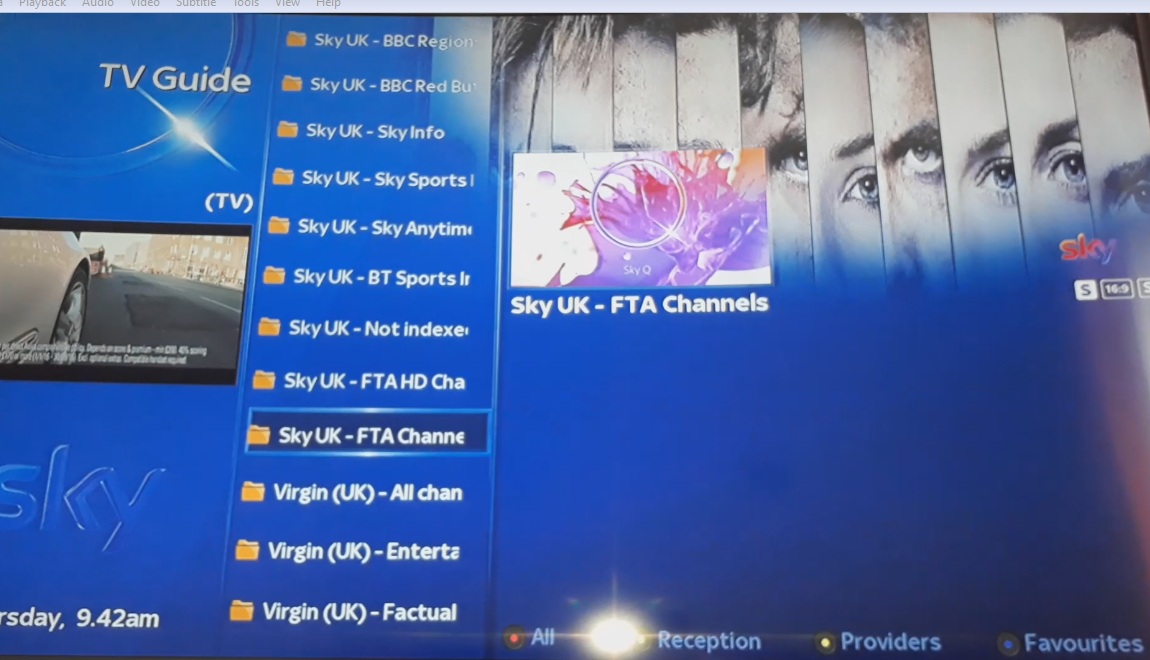
I now press MENU then settings then go down to Number of rows and change it to 21 then hit green to save. Now the gaps have got smaller inbetween the bouquets and all my S*y channels are on the same page:
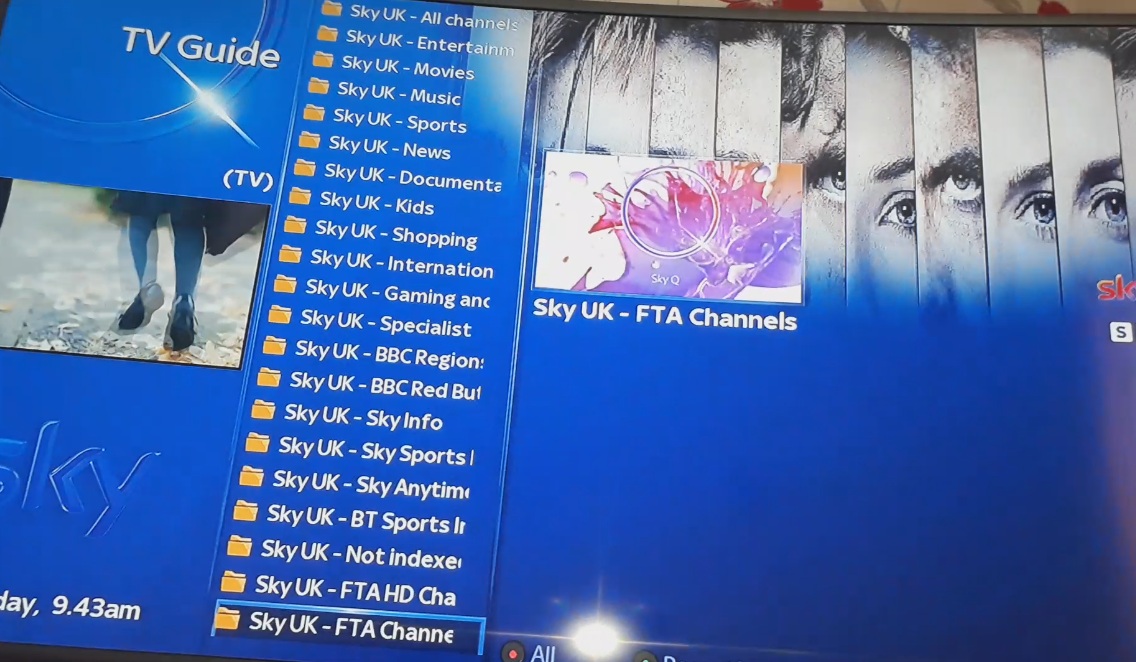
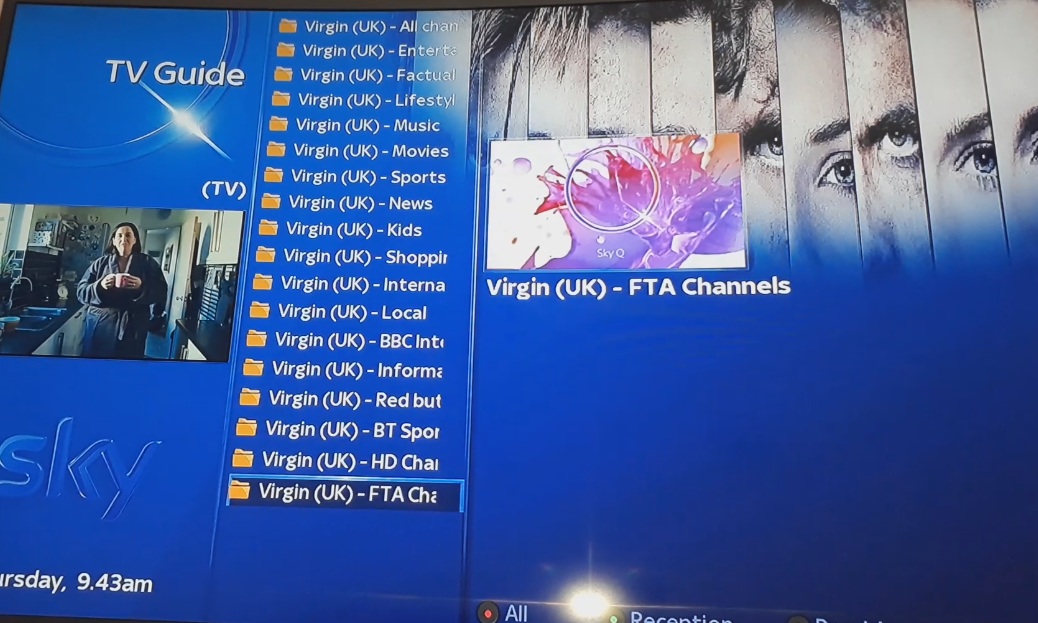
Then if I hit the right arrow, it goes over to my V*rgin bouqets which are again, all on the same page.
At this stage, you should have all FTA channels clearing on SATELLITE and channels 1-5 (SD) on CABLE ... remember that on cable, only 1-5 in SD will clear without the line.
Now I will add my line details to the box - there's the USB Cam Importer method but I prefer to simply access the box via my computers' network >
Once the line is on the box, I put the channel onto S*y Sports 1 HD on the V*rgin bouquet so it's just the black screen then i'll press the blue botton on the remote and go down to Softcam then across to Softcam Panel then go into it and change Select Cam 1 to the cam you're using - I am using mgcamd so i'll use the right arrow on the remote to select it and hit GREEN to Start it... after a few seconds, your cam will kick in and the channel will clear.
Now you need to check the mounts is set up right - press the pause button on the remote, if it pauses then great but if not, you need to change mount location.
Press the RED button on the remote then go to Plugins then click on Mount Manager - if the mount shows /media/sda1 on the right like so, this isn't correct.
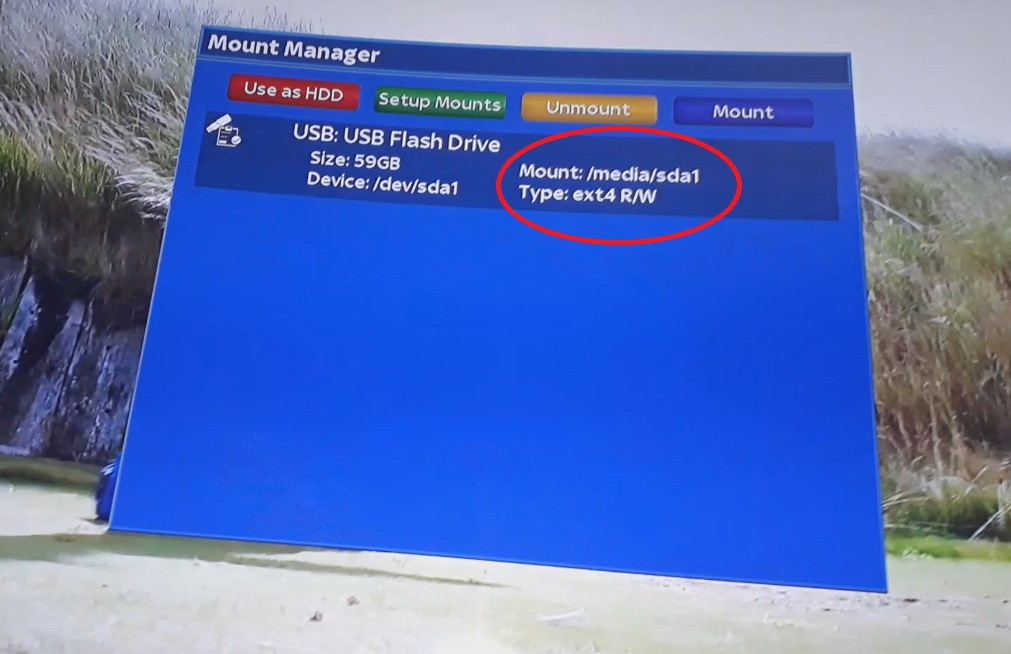
You need to press the GREEN button to Setup Mounts and press the right arrow to change it to media/hdd then hit GREEN to save.
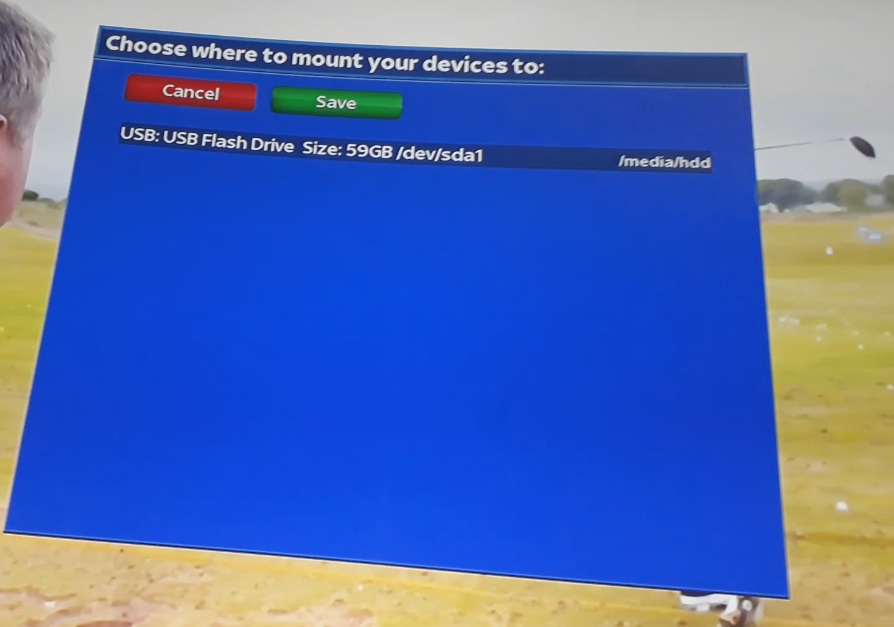
The box will re-start and on re-start pause will now work and timeshift too and recordings will all be set correctly to the right location.
CONTINUED ON NEXT POST:
***Please note that although this thread is primarily for the H2.H, it's very similar to setup other boxes including the H5.2TC***
I know there's a few of these around already but some people still seem to struggle so I thought i'd add my own incase it helps...
Please try and follow this guide carefully as there's people that have not done as described below then wonder why it hasn't worked.
My thread on cable boxes should also be viewed too ideally prior to setting your box up as this gives you pointers on some things > http://www.techkings.org/threads/faq-should-i-buy-a-cable-box.126162/
Ok, so you have just received you nice new zgemma box from the postman / postlady or courier...
You are overjoyed and want to get stuck in - you open the box and find the follwing;
* 1 x Zgemma H2.H
* 1 x Power Adapter
* 1 x Small HDMI Cable
* 1 x Remote (Batteries Not Included... Not The Film)
* 1 x Useless Instructions
Your H2.H will look like this at the back:
***If you have a H5.2TC, there may not be a loop out***
I am connecting both Satellite and Cable - the Satellite lead goes into the LNB IN port via the screw on F connection (Don't overtighten) and the Cable lead goes into the RF IN port via the additional little adapter you should have bought which look like this:
(NOTE: You may not need this if you already have a cable that looks like this at the end - the V6 box does I believe).
Once you've plugged everything in, it should look like so (as long as you're using both sat and cable):
I haven't connected a USB drive to the rear port yet - I will do this once it's in the set-up process.
Ok, now you need to get your USB drive to flash the box - this should have the firmware on it ready then plug it into the front port of your zgemma then turn it on with the button at the back - It should come on the display at the front BOOT then change to FL5H within a couple of seconds.
Firmware can be obtained by following the link to the Wooshbuild site in the top right of this page > http://www.techkings.org/resources/wooshbuild-v5-zgemma-s-2s-h2s-h52s-h2h-h5-h52tc-h1-h2-i55.10/
Once it's flashed, the front display will change to BOOT and the progress indicating will start counting up on the box - your TV screen will now display a Wooshbuild screen followed by a little video animation clip - as soon as this video starts, hit one of the coloured buttons on the screen and now you should have Easy Setup displayed on your screen.
Now, insert your USB drive that you will be using permanently into the USB REAR port then hit the GREEN button on the remote to continue.
You will now be asked is it ok to delete existing data and initialise the drive - select YES and press OK.
On the next screen, make sure your USB device is visible and highlighten then click on GREEN to continue - this will then bring up another screen asking you to confirm, press GREEN to continue.
Once again, it will ask "Are you sure..." - select YES and press OK... It will then begin to initialise the USB drive which takes a minute then once it's done this, it will automatically start to create the swap file - you don't need to press anything at this stage, just wait for it to get to the "Select your Country" screen - I am in England so I obviously chose England then hit GREEN to select it... it will again ask "Is this correct" - select Yes and press OK.
It will then go to region selection - I am in merseyside so I obviously chose merseyside and hit OK to select it. It once again asks "Is this correct" - select yes and hit OK.
It will then ask you to confirm flashing of Wooshbuild - hit GREEN for yes.
It will once again ask "Are you ready..." - hit GREEN for "Do It Now"
It will now download the latest version onto the box and begin to FLASH! ... sit back and wait whilst enjoying the Flash Gordon tune
After a minute or two, the screen will show ofgwrite Flashing Tool - the FLASH music will stop after a few seconds and the screen background will turn white ... you will get some info along the bottom regarding bad blocks - this is normal and nothing to worry about.
Once this is complete, your box will begin to boot up and after a couple of seconds, the Wooshbuild splash screen will display on your tv screen - once it's fully booted up, if you have it set up like me, your SATELLITE channel will start to play BBC1 HD.
The box is now flashed and you're ready to start setting it up.
You want to press MENU on remote then go down to Setup then go down to Service Searching then Tuner Configuration so you see your tuners displayed here...
If you don't want to use the SATELLITE tuner, select it by pressing OK then press the right arrow on the remote to change Configuration mode from Simple to Not Configured then hit green to save then exit out back to the above screen then go down to Tuner B which is the cable tuner and press OK.
Here, go down to Network ID and enter your Network ID for your area - nothing else needs to be changed... just enter your ID then hit GREEN to save.
***Note: If you have the H5.2TC, you will have an extra tuner (C) which you also need to go into and enter your ID the same way***
Now exit out of this and go back into MENU > SETUP > SERVICE SEARCHING then go into the AutoBouquetsMaker section. Click on Configure and change -Time of scan to start ... I set mine to start at 05.00 then if you're using both SATELLITE and CABLE then go to Add provider prefix to bouquets and change it to yes - this will make it easy for you to tell which bouquets are relevant to each service. Hit GREEN to save.
Now, in the AutoBouquetsMaker menu again, move to Providers and press OK then wait a few seconds for the providers list to populate.
As i'm using SATELLITE, I need to change the -S*y UK: area to my region then I need to carry on going down to -S*y UK: generate main bouquet and change this to yes then go further down the list until you get to V*rgin (UK) and change this from no to yes then go down to -V*rgin (UK): area and change this to your local region - if you cant find your exact location in this part, choose one that's as close to you as possible - this is just to give you bouquets that contain channels that are local to your region. Once you've done this, hit GREEN to save then back into the AutoBouquetsMaker menu list... at this stage you'll see a 'Hide sections' area - if you want to hide any bouquets for S*y or V*rgin then this is the area you do it in - again, just go into it and deselt ones you're not interested in (Adult for example) then take the tick off it and hit green to save your choices.
Now, it's time to start the actual service scanning so in AutoBouquetsMaker, go down to Start scan and hit OK. If you're using both SATELLITE and CABLE and you haven't changed the provider order, your S*y channels will scan first followed by the V*rgin channels.
Ok next, this isn't a neccesary step but I prefer the S*yQ skin so I press the Portal button on remote, go to --WB Config-- and press OK then go to Switch Skin and choose the S*yQ skin and press OK - it tells me that the GUI needs to restart to make the skin change - hit OK on yes then wait for the reboot.
I use the FAV button a lot at the bottom of the remote if I know what channel I want to watch and I like to have S*y on one page and V*rgin on the next so I can use the left and right arrows to go from S*y to V*rgin bouquets and vice versa so I will count how many S*y bouquets there is (I counted 21) so now on this same page as pictured below:
I now press MENU then settings then go down to Number of rows and change it to 21 then hit green to save. Now the gaps have got smaller inbetween the bouquets and all my S*y channels are on the same page:
Then if I hit the right arrow, it goes over to my V*rgin bouqets which are again, all on the same page.
At this stage, you should have all FTA channels clearing on SATELLITE and channels 1-5 (SD) on CABLE ... remember that on cable, only 1-5 in SD will clear without the line.
Now I will add my line details to the box - there's the USB Cam Importer method but I prefer to simply access the box via my computers' network >
Once the line is on the box, I put the channel onto S*y Sports 1 HD on the V*rgin bouquet so it's just the black screen then i'll press the blue botton on the remote and go down to Softcam then across to Softcam Panel then go into it and change Select Cam 1 to the cam you're using - I am using mgcamd so i'll use the right arrow on the remote to select it and hit GREEN to Start it... after a few seconds, your cam will kick in and the channel will clear.
Now you need to check the mounts is set up right - press the pause button on the remote, if it pauses then great but if not, you need to change mount location.
Press the RED button on the remote then go to Plugins then click on Mount Manager - if the mount shows /media/sda1 on the right like so, this isn't correct.
You need to press the GREEN button to Setup Mounts and press the right arrow to change it to media/hdd then hit GREEN to save.
The box will re-start and on re-start pause will now work and timeshift too and recordings will all be set correctly to the right location.
CONTINUED ON NEXT POST:
Last edited: